
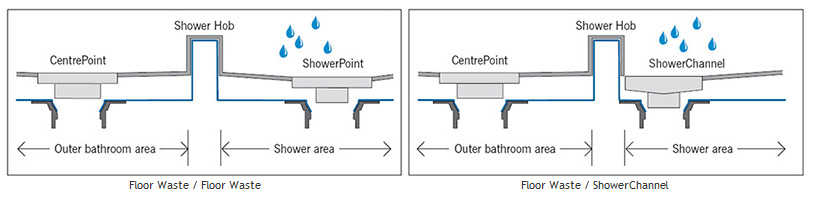
Installation Overview
ShowerChannel Installation Overview
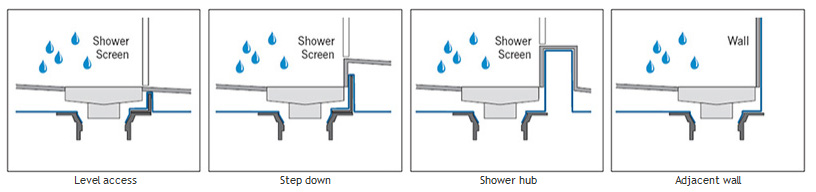
Tiled showers rely on a linear drainage system that is easily integrated into the screed above the waterproofing. QuARTz by ACO offers a channel profile that ensures compatibility with different floor structures.
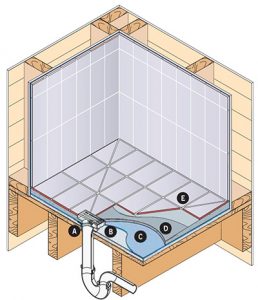
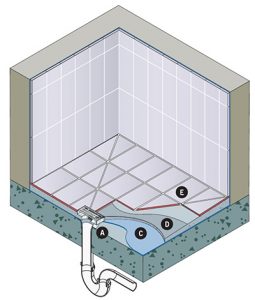
The installation details shown, set out to provide the designer with integrated solutions for wet room floor drainage. The illustrations identify preparation, the installation and construction processes required to install these products in wet room environments.
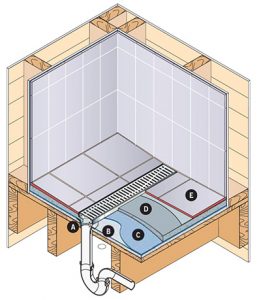
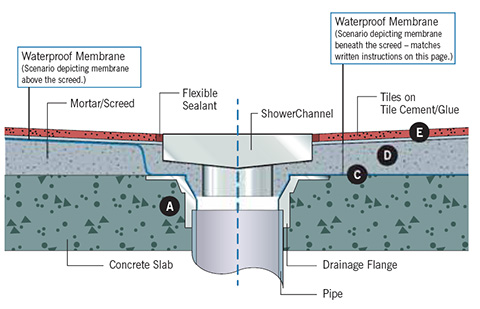
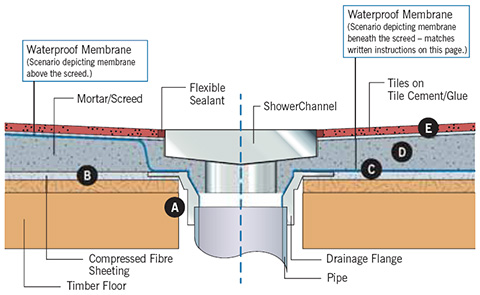
For both flooring applications, two alternative positions for the waterproof membrane are illustrated. However for simplicity, the written guidelines below and opposite refer to the waterproof membranes that are applied beneath the screed mortar bed only. A drainage flange is shown to provide bracing to the connection and control leakage of the mortar screed bed. It should be recessed into the floor with a router for a timber deck or diamond grinder, for a slab.
These details do not cover every possible situation and should only provide a practical reference. ACO recommends designers and installers check local legislative standards and practices or seek specialised engineering advice.
| Concrete above screed | Concrete below screed | Timber above screed | Timber below screed |
|||||
|---|---|---|---|---|---|---|---|---|
| Standard | ||||||||
| Level access with shower screen | ||||||||
| Step down | ||||||||
| Shower hob | ||||||||
| Adjacent to timber wall | ||||||||
| Adjacent to brick wall | - | - | - | - | ||||
Typical Scenarios

 Where alterations to floor joists are necessary, consult a structural engineer for advice. Floor joist reinforcement may be necessary.
- Frame out the shower surround as required, leaving a penetration in the wooden floor for drainage.
- Connect an appropriately sized drainage flange (A) to the pipework. Ensure it is adequately fastened or bonded in position.
- Block the drain opening with a rag to prevent floor mortar blocking up the pipe.
- Lay compressed fibre sheeting (B) (or similar) and create levels if required. Ensure the sheeting is finished flush with the drainage flange and that there are no rough edges for the waterproof membrane to bridge.
- The waterproof membrane (C) is then applied to the sheeting and continued on to and turned into the drainage flange as well as up the wall, in accordance with AS3740. It is then left to cure before covering.
- Cut installation feet of the ShowerChannel to height to rest on the membrane and ensure channel is kept at required height and level.
- A screed is then laid (D) and trowelled to the correct levels and height, allowing for the thickness of the overlying tile layer.
- After the screed has cured, apply tile cement, tiles and grout (E).
- Place the grate in the channel.
 Where alterations to floor joists are necessary, consult a structural engineer for advice. Floor joist reinforcement may be necessary.
- Frame out the shower surround as required, leaving a penetration in the wooden floor for drainage.
- Connect an appropriately sized drainage flange to the pipework. Ensure it is adequately fasted or bonded in position.
- Block the drain opening with a rag to prevent the floor mortar blocking up the pipe.
- Lay compressed fibre sheeting (or similar) and create levels if required.
- A screed is then laid and trowelled to the correct levels and height, allowing for the thickness of the overlying tile layer and channel depth. Allow for a framed out section for the channel. Allow to cure.
- After the screed has cured, the waterproof membrane is then applied to the screed and continued on to and turned into the flange as well as up the wall, in accordance with AS3740. It is then left to cure.
- After the membrane has cured, insert channel and set into a mortar bed.
- When the mortar holding the channel has set, apply tile cement, tiles and grout.
- Place the grate in the channel.
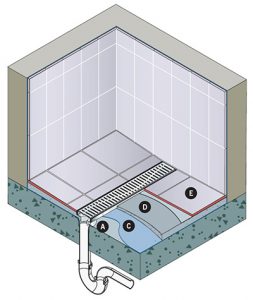 Frame out the shower surround as required, leaving a penetration in the concrete floor for drainage.
- Connect an appropriately sized drainage flange (A) to the pipework.
Ensure it is adequately fastened or bonded in position and flush with the top of the concrete slab. A drainage flange is particularly recommended for rectification applications. - Block the drain opening with a rag to prevent floor mortar blocking up the pipe.
- The waterproof membrane (C) is then applied to the slab and continued on to and turned into the drainage flange as well as up the wall, in accordance with AS3740. It is then left to cure before covering.
- Cut installation feet to height to rest on the membrane and ensure channel is kept at required height and level.
- A screed is then laid (D) and trowelled to the correct levels and height allowing for the thickness of the overlying tile layer.
- After the screed has cured, apply tile cement, tiles and grout (E).
- Place the grate in the channel.
Floor Waste Installation Overview
QuARTz by ACO offers floor wastes compatible with different floor structures.
The installation details shown, set out to provide the designer with integrated solutions for wet room floor drainage. The illustrations identify preparation, the installation and construction processes required to install these products in wetroom environments. For both flooring applications, two alternative positions for the waterproof membrane are illustrated.
However for simplicity, the written guidelines below refer to the waterproof membranes that are applied beneath the screed mortar bed only. A drainage flange is shown to provide the bracing to the connection and control leakage of the mortar screed bed. It should be recessed into the floor with a router for a timber deck or diamond grinder for a slab.
These details do not cover every possible situation and should only provide a practical reference. ACO recommends designers and installers check local legislative standards and practices, or seek specialised engineering advice.
| Method | Membrane type | Standard | |
|---|---|---|---|
| Concrete | Above screed | ||
| Below screed | |||
| Timber | Above screed | ||
| Below screed | |||
Typical Scenarios
 Where alterations to floor joists are necessary, consult a structural engineer for advice. Floor joist reinforcement may be necessary.
- Frame out the shower surround as required, leaving a penetration in the wooden floor for drainage.
- Connect an appropriately sized drainage flange (A) to the pipework.
Ensure it is adequately fastened or bonded in position. - Block the drain opening with a rag to prevent floor mortar blocking up the
pipe. - Lay compressed fibre sheeting (B) (or similar) and create levels if required.
Ensure the sheeting is finished flush with the drainage flange and that there are no rough edges for the waterproof membrane to bridge. - The waterproof membrane (C) is then applied to the sheeting and continued on to and turned into the drainage flange as well as up the wall, in accordance with AS3740. It is then left to cure before covering.
- Build up the screed to support the floor waste to the correct finished floor level.
- A screed is then laid (D) and trowelled to the correct levels and height, allowing for the thickness of the overlying tile layer.
- After the screed has cured, apply tile cement, tiles and grout (E).
- Place the grate on the floor waste
- Where alterations to floor joists are necessary, consult a structural engineer for advice. Floor joist reinforcement may be necessary.
- Frame out the shower surround as required, leaving a penetration in the wooden floor for drainage.
- Connect an appropriately sized drainage flange to the pipework. Ensure it is adequately fasted or bonded in position.
- Block the drain opening with a rag to prevent the floor mortar blocking up the pipe.
- Lay compressed fibre sheeting (or similar) and create levels if required.
- A screed is then laid and trowelled to the correct levels and height, allowing for the thickness of the overlying tile layer and floor waste depth. Allow for a framed out section for the floor waste. Allow to cure.
- After the screed has cured, the waterproof membrane is then applied to the screed and continued on to and turned into the flange as well as up the wall, in accordance with AS3740. It is then left to cure.
- After the membrane has cured, insert floor waste and set into a mortar bed.
- When the mortar holding the floor waste has set, apply tile cement, tiles and grout.
- Place the grate in the floor waste
 Frame out the shower surround as required, leaving a penetration in the concrete floor for drainage.
- Connect an appropriately sized drainage flange (A) to the pipework.
Ensure it is adequately fastened or bonded in position and flush with the top of the concrete slab. A drainage flange is particularly recommended for rectification applications. - Block the drain opening with a rag to prevent floor mortar blocking up the pipe.
- The waterproof membrane (C) is then applied to the slab and continued on to and turned into the drainage flange as well as up the wall, in accordance with AS3740. It is then left to cure before covering.
- Build up the screed to support the floor waste to the correct finished floor level.
- A screed is then laid across the floor (D) and trowelled to the correct levels and height allowing for the thickness of the overlying tile layer.
- After the screed has cured, apply tile cement, tiles and grout (E).
- Place the grate on the floor waste.
- Frame out the shower surround as required, leaving a penetration in the concrete floor for drainage.
- Connect an appropriately sized drainage flange to the pipework. Ensure it is adequately fasted or bonded in position and flush with the top of the concrete slab. A drainage flange is particularly recommended for rectification applications.
- Block the drain opening with a rag to prevent the floor mortar blocking up the pipe.
- Cut installation feet to height to rest on the concrete slab and ensure floor waste is kept at required height and level. Remove the floor waste.
- A screed is then laid and trowelled to the correct levels and height allowing for the thickness of the overlying tile layer and floor waste depth, allowing for a framed out section for the floor waste to go in later. Allow to cure.
- After the screed has cured, the waterproof membrane is then applied to the screed and continued on to and turned into the drainage flange as well as up the wall, in accordance with AS3740. It is then left to cure.
- After the membrane has cured, insert floor waste and set in place with mortar.
- After the mortar holding the drainage flange is set, apply tile cement, tiles and grout.
- Place the grate in the floor waste.